


Read time: 5 minutes
If you’re just getting started on your entrepreneurial journey, you probably don’t need to hire a designer or agency right away — unless you have the budget (which most people don’t). It’s totally okay to create things on your own for now.
In the early stages, you’re still figuring things out and building your brand’s vision. You don’t want to spend hundreds or thousands on branding, only to realize later it doesn’t fit where you’re headed. That would mean redoing everything — and reinvesting more money.
Instead, give yourself space to explore.
Start by DIY-ing your visual identity. We’ll walk you through how to create one using a mock organization on Canva — plus, we’ve included templates you can customize.
Canva is a free, beginner-friendly platform for creating graphics. Super simple to use and a great way to get started.
Helpful Downloads:
→ Download Creation Templates
→ Download Brand Guideline Template
→ Download Creation Example
→ Download Brand Guideline Example
Why do you need a visual identity?
A strong visual identity helps people recognize and remember your brand. It also keeps everything consistent — across your website, social media, and beyond — so you build a cohesive brand experience.
Here’s how to create yours in 5 steps:
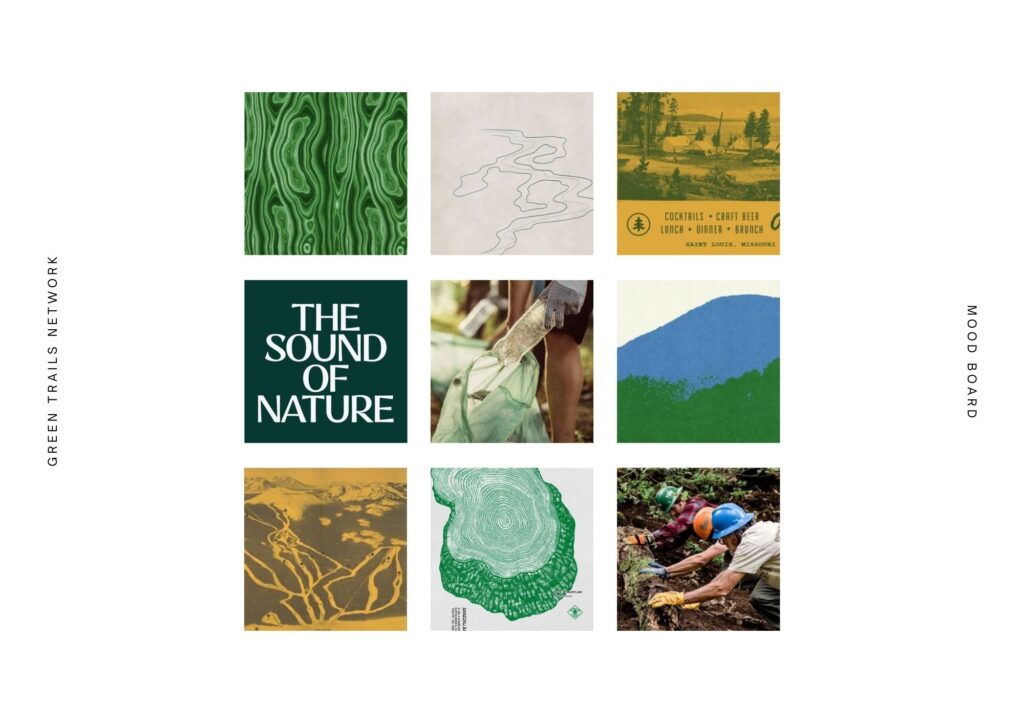
Step 1: Get inspired
Start by finding inspiration to guide your brand’s look and feel. Create a mood board on Pinterest or collect images from Google and other resources. (Use the template above to help.)
Look for visuals that resonate with your brand — colors, patterns, fonts, imagery styles, and overall vibe. Don’t just stick to branding examples; explore photography, movies, packaging labels, illustration — anything that sparks ideas.
Let this be your creative canvas.
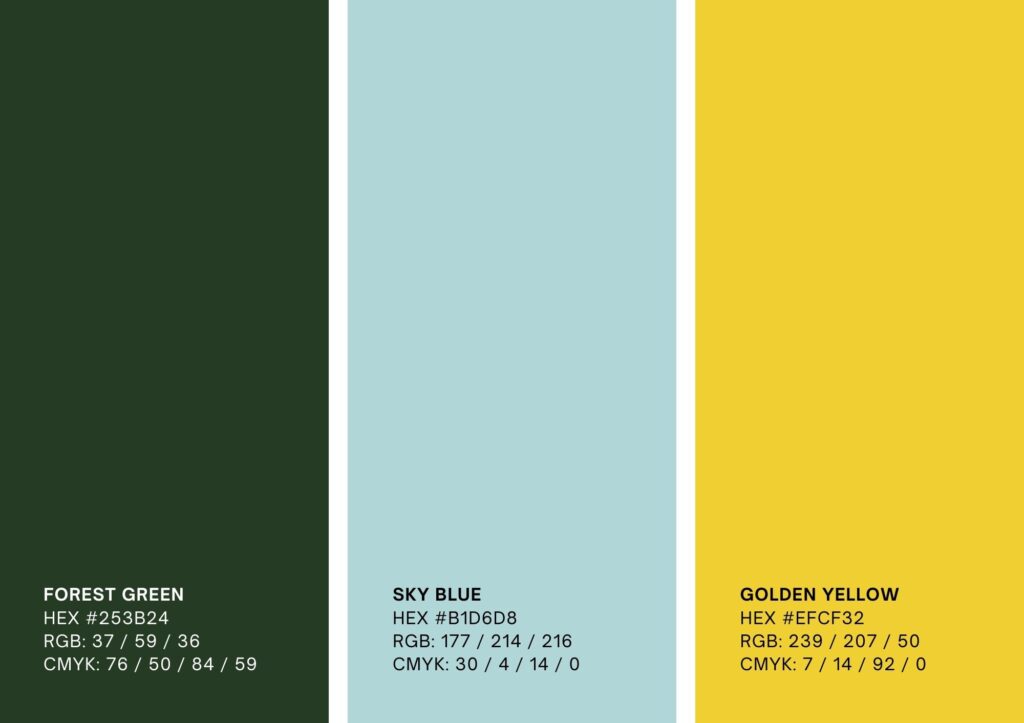
Step 2: Pick your colors
Choose 2–3 core colors, including both light and dark options, that reflect your brand’s personality and are easy to read.
Think about how colors make people feel — and whether they fit your message and audience. Think about the psychological impact of colors and the emotions they convey.
Color Hunt is a great free tool to explore palettes.
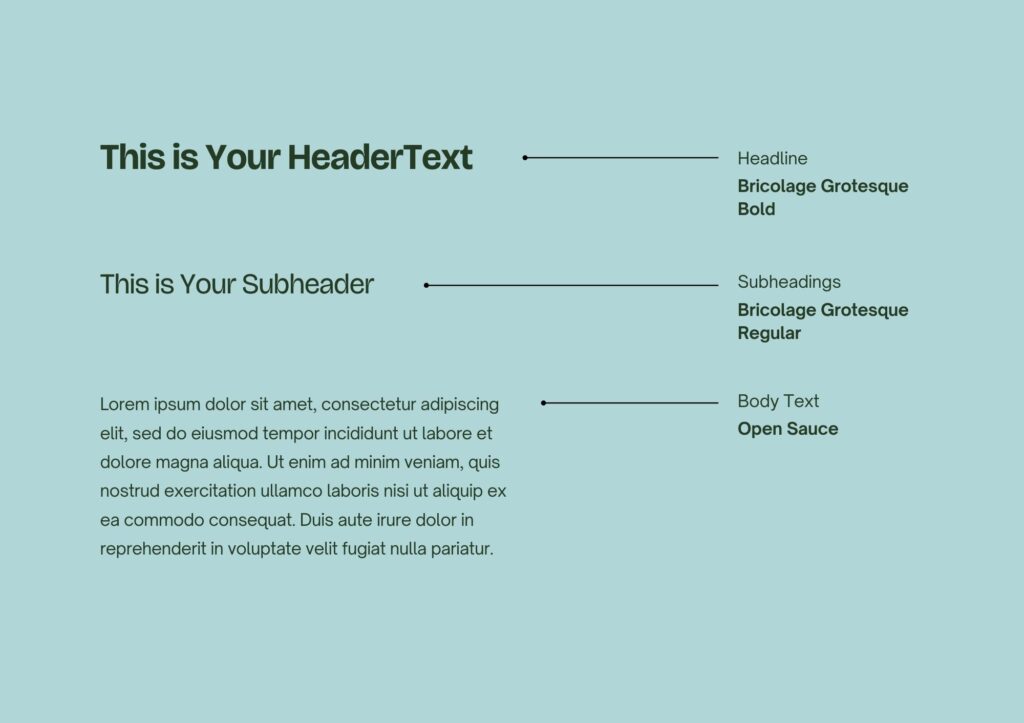
Step 3: Choose fonts
Select fonts that complement your brand’s personality and are easy to read. Use one primary font for headings and a secondary font for body text to keep your design organized.
Make sure both fonts are legible and consistent with your brand’s tone and style. Factors to consider include readability, scalability, and compatibility with digital and print media.
Tip: Avoid cartoonish or overly decorative fonts if you want a professional look.
Step 4: Design your logo.
Create a logo that’s simple but memorable. Use your chosen fonts to write out your brand name. Keep it clean–make sure it looks good in both horizontal and vertical formats.
Be creative but don’t overdo it. Your logo should be easy to recognize and read at a glance.
Consider also designing a small brand mark or icon you can use in tight spaces like social media profile pictures.
Step 5: Create guidelines.
Put everything together in a brand guidelines document. It helps everyone understand how to use your brand’s visuals correctly.
This should include your logo, colors, fonts, and basic usage rules — keeping your visuals consistent and recognizable across all platforms.

Now you have a brand look!
Following these 5 steps will boost your brand’s visibility and create a stronger first impression.
Remember: your brand will grow and evolve. It’s okay if your first version isn’t perfect. Use what you have, get feedback, and refine as you go.
Happy creating!
Want to share what you built? Email your brand guidelines to hello@folkscreative.co. We’d love to see them!
P.S. If this guide helped you, send me a note on LinkedIn. I’d love to hear about it.
– Michelle
Founder & Creative Director, Folks Creative


How to Build a Visual Identity: A 5-Step Guide for Beginners